The Hunter Original® fans have become the apple of the eyes of the house owners from the very beginning. Hunter Original fan came into existence in 1906, designed for durability and equipped with cast iron materials and a motor that functions with the help of an oil bath lubrication. While other ceiling fans from hunter do not need oiling, Hunter original is the exception due to its unique motor system causes the main bearings to stay lubricated to operate quietly all the time.
The system has been working for over 135 years. Having said that, adding and replacing the oil in the Original ceiling fan by Hunter is necessary. Here’s an easy guide on how to oil a Hunter ceiling fan.
How to Oil a Hunter Ceiling Fan During Installation
Your fan will be shipped without oil in the motor, so you will have to add oil before you start using it.
You need to locate a tube of Hunter high-grade SAE 10 non-detergent oil packaged in the hardware bag. It is imperative that you use Hunter’s oil because the wrong oil can damage the fan.
Things Needed to Oil the Hunter Original Ceiling Fan
- Hunter oil for model
- Step ladder
- Screwdriver
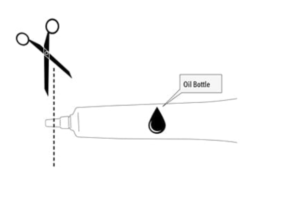
- Scissors for cutting the tip on the tube of oil
- Pipe cleaner
- Hunter Fan product manual
Oiling the Model #51123
- Open the oil cap and cut the tip off from the end of the tube.
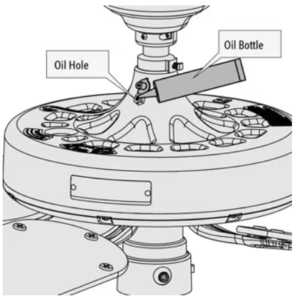
- The next step is to lift the cap of the oil hole to the oil reservoir located at the top of the unit.
- Now, put the tube into the oil hole and squeeze the tube gently to empty the oil into the reservoir of the fan.
- after filling the reservoir, the next thing is to check the oil level immediately to make sure it’s filled properly (follow the instructions in this guide on how to check your fan’s oil level).
- After filling the reservoir, replace cap
TIP: To prevent overflowing during filling, it is ideal to add a third of the oil from the tube at a time. Wait for 30 seconds between each third so the oil gets settled in the fan. You need to ensure that you add all the oil in the tube to the fan.
How do you Lubricate a Hunter Ceiling Fan When Moving its Location
If you need to move your Hunter original fan, you have to remove the existing oil from the fan to avoid spilling it. Take and utilize the original hanging system in your new space but if it requires replacement, you need to get a relocation kit of Hunter for that.
After completing the installation once again, follow the above steps to refill the oil in the Anniversary edition or original fan.
How to Check the Oil Level in Your Hunter Original Fan
To maintain the best performance of the unit, Hunter’s experts suggest you check the oil level in your unit every 1-5 years, even if the fan is working fine.
If your Hunter ceiling fan is making a noise, it could be happening due to several reasons, one of them is needing oil.
Follow these simple steps to check the oil level:
- Firstly, switch off the power to the fan
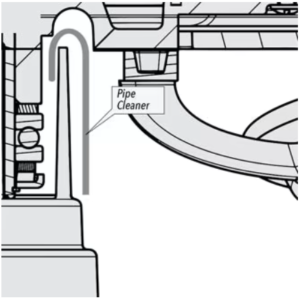
- Bend a ½-inch hook on one end of a basic pipe cleaner
- Dip the hook into the oil reservoir
- Get rid of the pipe cleaner and examine that if the oil has touched the end of the hook
If the pipe cleaner contains oil on it, that shows the reservoir is full.
If the pipe cleaner does not have oil on the end, add more oil until you repeat Step 4 and check and see the oil on the pipe cleaner.
Where to Get Oil for Your Hunter Original Fan
After getting solution for how to oil a hunter original fan the next thing is where to find it.
Hunter’s 1 oz. tube of Hunter high-grade SAE 10 non-detergent oil is especially available to give the unique oil bath lubrication system of the Hunter Original® ceiling fans for a lifetime of noiseless function. If you will use the wrong oil, it can damage the fan, so make sure you use our recommended oil designed for the Hunter original fan to make its rotation smooth. We have added the link to the oil above to purchase.
Maintaining the oil level in your Hunter Original fan does not need a lot of effort or time and the maintenance of the oil can give long-lasting, quality performance that you can rely on to get the comfort you are looking for.


Leave a Reply