Do you want to get instructions on how to program a Hunter ceiling fan remote? The main part is, programming needs that you need to “pair” the Hunter remote with the receiver to complete the task. If you ever had to pair a Bluetooth device before, like pairing your cell phone to your car, then you will be able to do this. As you are familiar with it how it works.
Once you have “paired” the two devices, they can communicate with one another and you are good to go. It is very easy. If they are not paired, it means that they are not compatible, or there is problem with any of the devices.
If you have purchased a new remote and it won’t pair, it is more likely that the issue is with your receiver. If that is the case, we prefer to get a new Hunter universal ceiling fan remote and receiver kit.
After purchasing one of them, the remote and the receiver will be compatible because they are packed together.
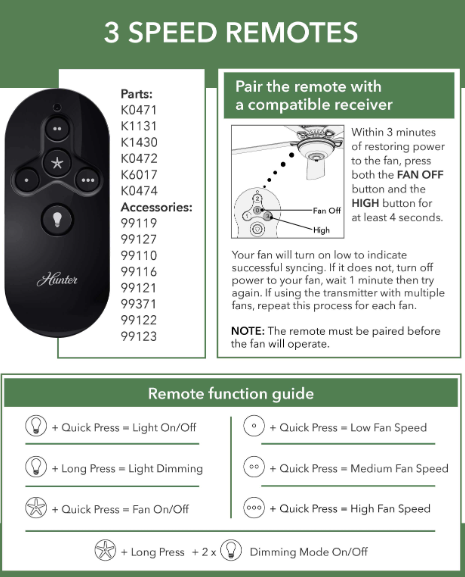
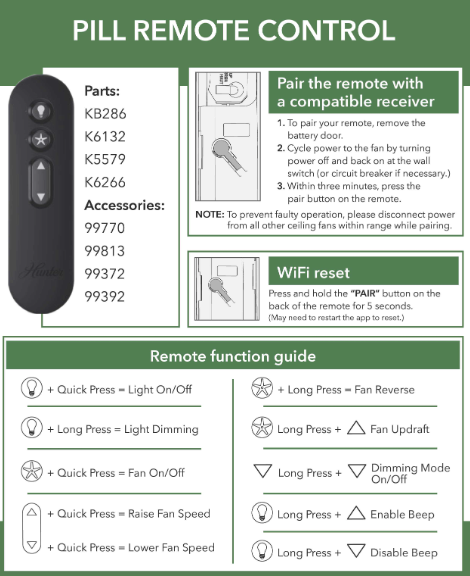
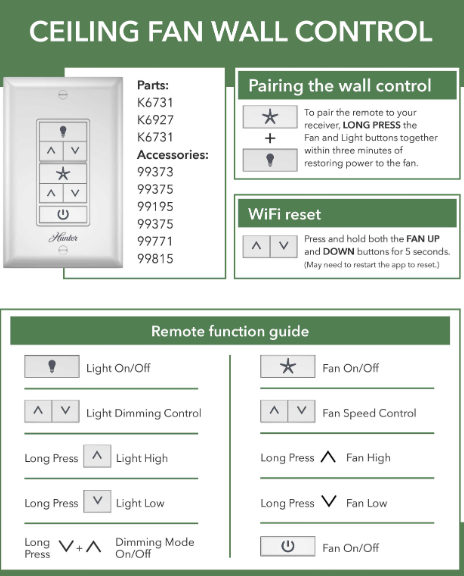
We have added a diagram that gives instructions on how to pair the Hunter remote with the receiver. Usually, it has three steps as you will see below. The part numbers that are compatible with these instructions are available on the left side.
The last part of the diagram also describes what is the function of the buttons on the remote, apart from the pairing the remote. Long presses perform different tasks than quick presses.
Although these instructions are very easy and simple and that is the way Hunter wants it to be. Just remember that we are not the manufacturer. To find out the manufacturer of Hunter, see: Where are Hunter Ceiling Fans Made?
How to Program a Remote Control with Specific Hunter Fan Models
Most Hunter ceiling fans made since 2016 are ‘5’ Series Fans, whereas the older fan models are ‘2’ Series Fans. To get help in finding your model number, check: How to Find Hunter Ceiling Fan Model Number
Pairing a Hunter ‘5’ Series Model Fan
Hunter Remote Model Numbers Programming: 99371/k6017, k532401000, k5323, 99116/k140302000, 99110/K113101000, 99122/99123/k0474010000, and 99199/99127/k047101000
- Switch off the power to your fan with the help of the wall switch, and turn it off for at least 10 seconds to make sure the controller has enough time to properly shut down. After that switch the power back on.
- Press and hold both buttons, the ‘FAN’ button and the ‘SPEED 3’ button for at least four seconds. This process should be completed within three minutes of restoring power to the fan.
- If previously unpaired, it will pair the remote and receiver now. The fan settings will be set to low speed. The light will blink 3 times and stay on.
- If the remote and receiver were previously paired, they will unpair. If running, the fan will switch off. The light will blink 2 times and switch off.
NOTE: If the pairing is not successful, switch off the power to your fan from the wall switch, wait one minute, and then retry the process.
Hunter Remote Model Numbers Programming: k626601000/k626602000, 99372/k6019, k5579010000, and 99198/k6266-03
- Switch off the power to your fan with the help of the wall switch, turn it off for 5-10 seconds and then back on.
- Press and release* the ‘PAIR’ button quickly that is available on the back of the remote. This process should be completed within three minutes of restoring power to the fan.
- If the remote and receiver were previously unpaired, they will now pair. The fan will be set to low speed. The light will blink thrice and stay on.
- If the remote and receiver were previously paired, they will unpair. If running, the fan will switch off. The light will blink 2 times and turn off.
NOTE: If the pairing is not successful, switch off the power to your fan from the wall switch, wait one minute, and then retry the process.
* The button must be pressed and released in order to program them by sending a pairing command. Holding the PAIR button sends a different command for Wi-Fi resetting and will not disturb the remote programming.
Hunter Remote Model Numbers Pairing: 99370/k6018 and 99112/k113301000
- Switch off the power to your fan with the help of the wall switch, turn it off for 5-10 seconds and then back on.
- Press and hold both buttons, the ‘FAN’ button and the ‘LIGHT’ button for at least four seconds. This process should be completed within three minutes of restoring power to the fan
- If the remote and receiver were previously unpaired, they will now pair. The fan will be set to low speed. The light will blink thrice and stay on.
- If the remote and receiver were previously paired, they will unpair. If running, the fan will switch off. The light will blink 2 times and turn off.
NOTE: If the pairing is not successful, switch off the power to your fan from the wall switch, wait one minute, and then retry the process.
Pairing a Hunter ‘2’ Series Model Fan
- Switch off the power supply to your fan from the wall switch or circuit breaker.
- Take out the batteries from the remote control
- Change the Dip switches on the remote transmitter and the receiver to make sure they are matched. (remember that not all receivers contain Dip switches.)
- Turn on the electricity to the fan and put the batteries back in the remote control.
- Press and release the three HIGH (3), MEDIUM (2), and LOW (1) buttons from the remote simultaneously. This step must be finished within 30 seconds of span.
- Now, ensure that your fan is successfully programmed by adjusting/controlling the fan and lights on and off using the remote control.
Just remember that these programming instructions are only valid for the models that are available on the left in the image.
That’s it. This is how you program a Hunter fan remote.
Where is the DIP Switch on a Hunter ceiling fan?
The DIP switches on the Hunter fan are available under the battery compartment of the remote and on the flat side of the receiver.


Leave a Reply