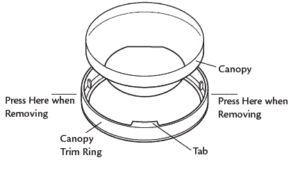
There are many reasons that may compel you to remove the canopy from the ceiling fan. You might need to check the electrical wiring, you might need to install a remote control receiver, or you might have to disconnect the unit to remove it. It cannot be done until you access the screws of the canopy. Removing the canopy trim ring on a Hunter ceiling fan is not as easy as it seems. The trick to doing it is to stand in the right position and you can remove it.
Equipment Required
- Ladder
#1 Step
You need to a stepladder to access the canopy trim ring at the top of the canopy the hunter fan attaches to the ceiling. The mounting bracket and the electrical box of the ceiling fan are covered with a canopy. The canopy screws are covered with the canopy trim ring that provides a sleeker design to the ceiling fan.
#2 Step
To find the tab indicators, you need to feel the canopy trim ring. The tab indicators will be small bumps on the top of the two tabs.
#3 Step
You need to press on the canopy trim ring using your fingers to the right and left of the tab indicators. Facing one of the tab indicators on the canopy trim, put your hands at the 3 o’clock and 9 o’clock positions on the trim and press in. The tabs will be bent outward and enabling the trim to release from the canopy.
We hope that you have successfully learned how to remove canopy trim ring on hunter fan.

Leave a Reply